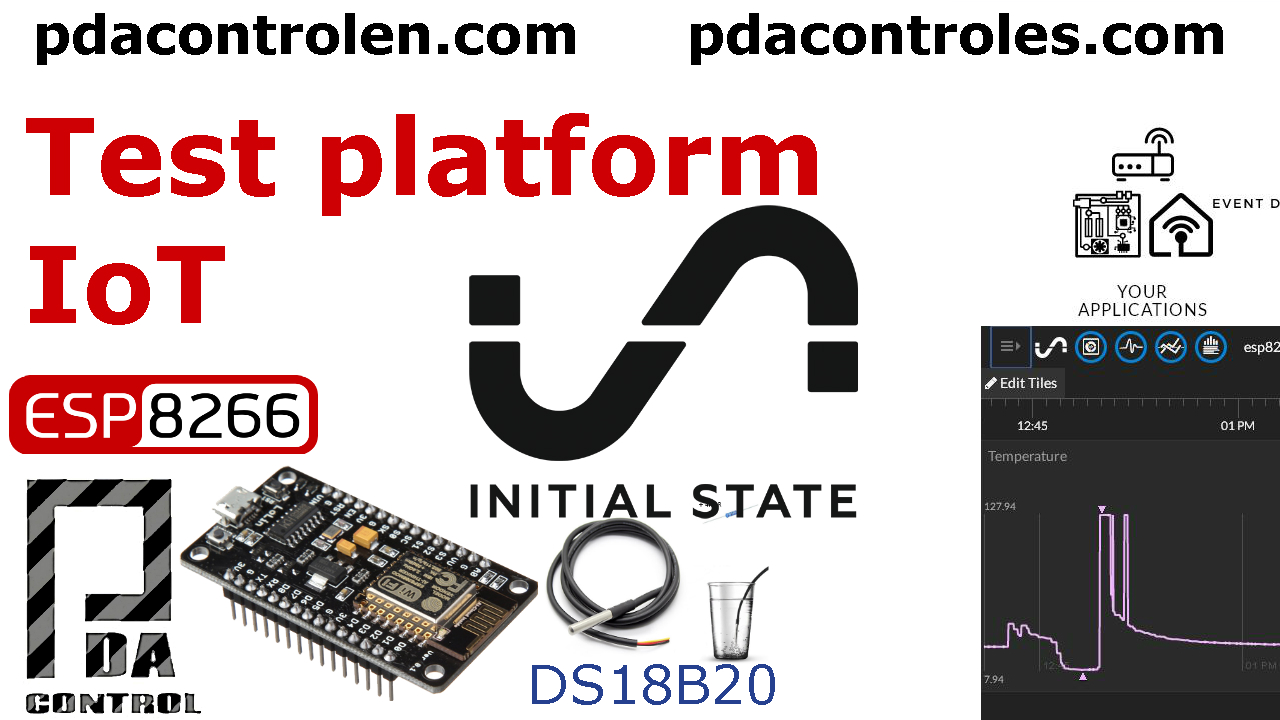
En esta ocasión hemos realizado pruebas a la plataforma Initialstate, es una plataforma IoT dedicada a la recolección y visualización de datos, creando vistosos gráficos.
Para nuestra prueba utilizaremos el Modulo ESP8266 y un sensor DS18B20 Onewire para recolectar temperatura y posteriormente visualizarla.
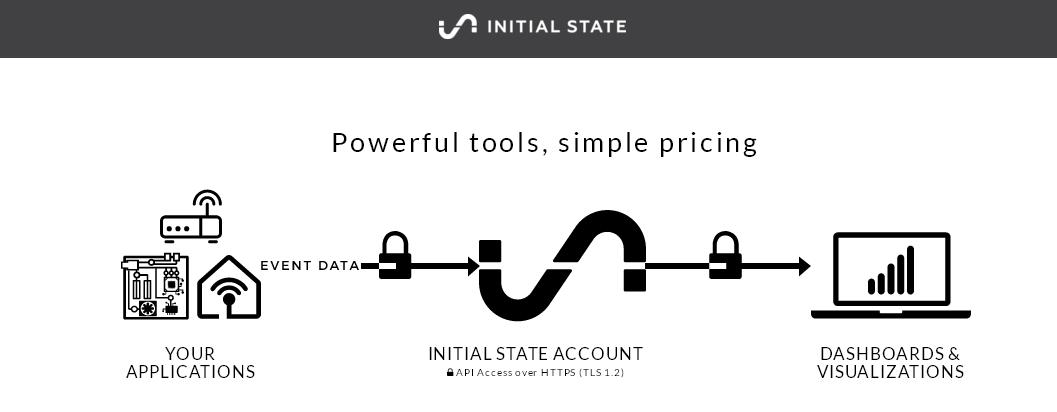
Envíe con seguridad los datos de series temporales a su cuenta desde sensores, dispositivos, software o cualquier cosa que pueda hacer una solicitud HTTP y HTTPS.
Pagina Oficial : Initialstate
Acontinuación hemos realizado 2 Tutoriales por si quieren realizar pruebas en esta plataforma IoT.
Prueba 1: Crear cuenta plataforma IoT Initialstate
La creación de la cuenta de prueba en Initialstate es gratuita, pero se deben tener en cuenta que existen limites y restricciones de las cuales hablaremos mas abajo.
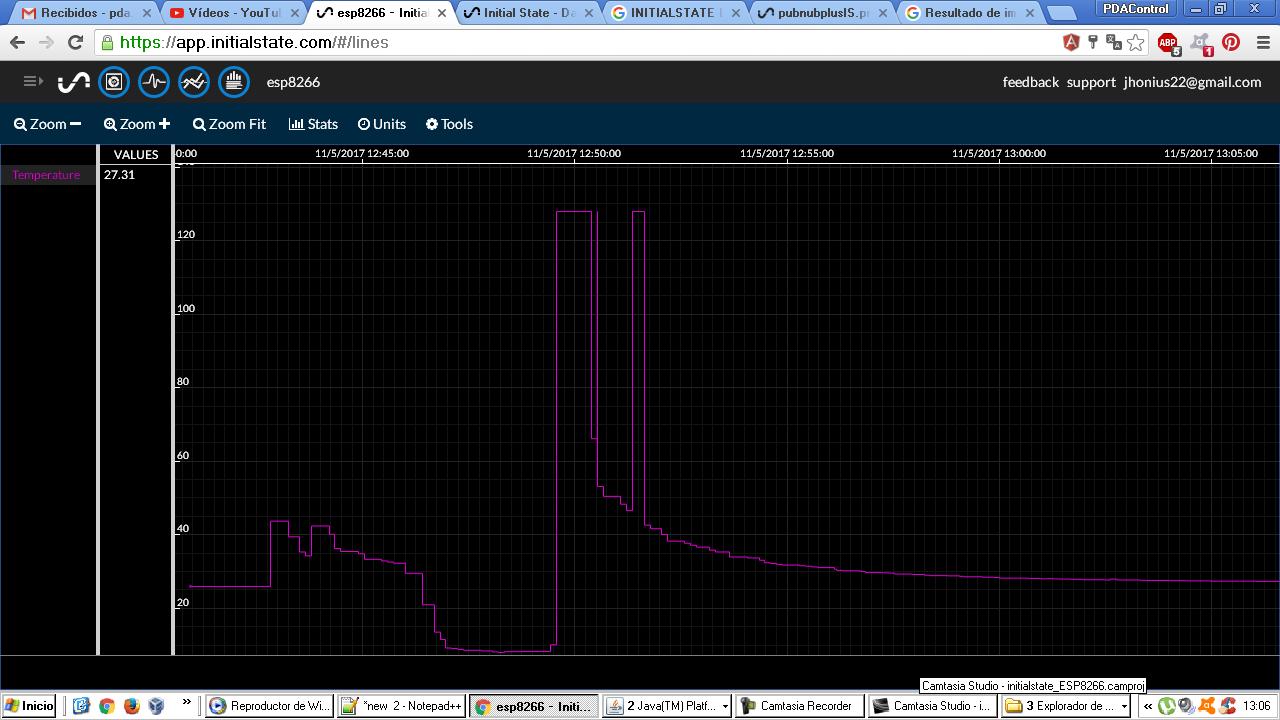
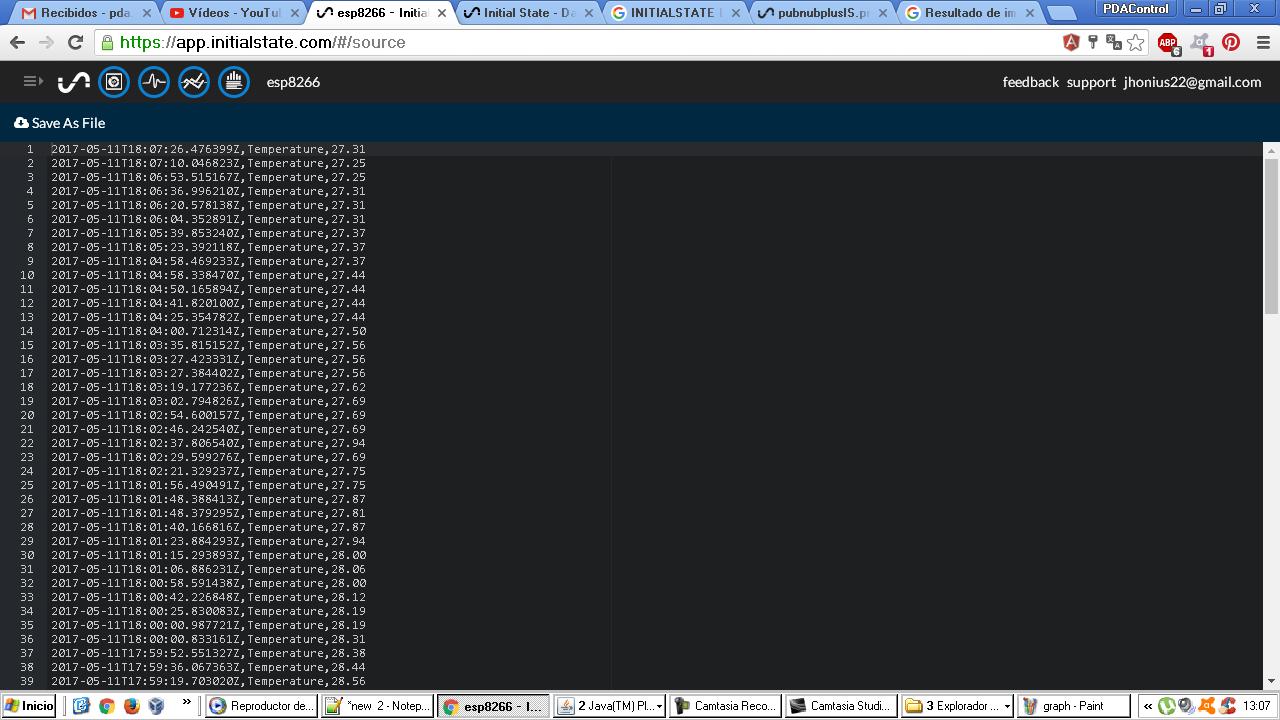
Prueba 2: Conexion ESP8266 y sensor DS18B20 a plataforma Initialstate
Utilizando Arduino IDE se realiza la programación y configuración del modulo ESP8266 12E NodeMCU, Hemos tomado un ejemplo de prueba y hemos realizado modificaciones para funcionar con el sensor de temperatura DS18B20 utilizando el protocolo de un hilo «Onewire«.
Se requieren los siguientes parametros de Initialstate para conexion Stream bucket:
- bucket Key
- bucketName
- accessKey
Materiales y Donde Comprarlos
Otras Referencias similares..
- Pruebas plataforma IoT Cayenne
- Pruebas plataforma IoT Node-RED
- Pruebas plataforma IoT blynk
- Otras Plataformas
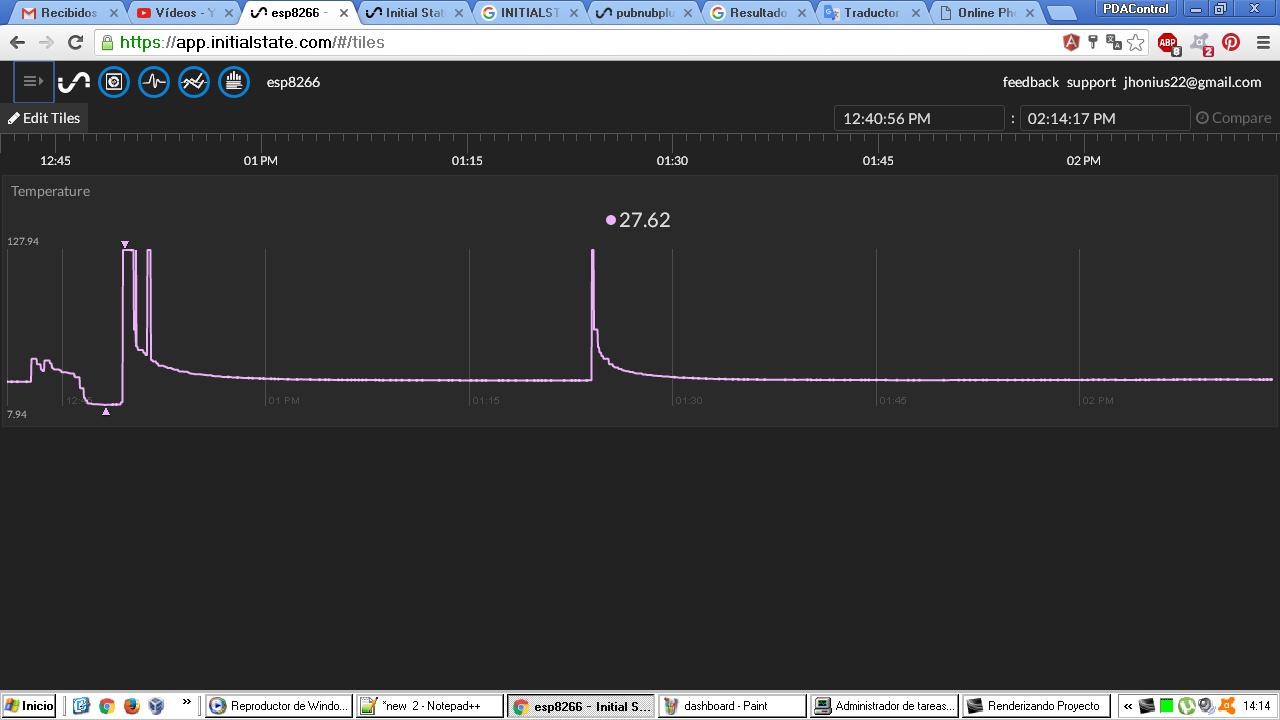
Algunas Visualizaciones y Gráficos
Codigo Arduino IDE
Codigo implementado en ESP8266:
Se requiere instalar previamente las librerias:
Librerias y ejemplos Arduino IDE InitialState Arduino Streamers
///https://github.com/initialstate/arduino_streamers
/*
// Will work with Ethernet Shield
// Thanks to Gaetano Carlucci
//
//
// Modified by PDAControl    /for Onewire
// May 2017
// http://pdacontrolen.com
//
*/
#include < OneWire.h >
#include  < DallasTemperature.h >
#include "ESP8266WiFi.h"
const char* ssid       = "*******";
const char* password   = "********";
const char* server = "insecure-groker.initialstate.com";

///char server[] = "insecure-groker.initialstate.com";    // name address for Google (using DNS
// Data wire is plugged into port 2 on the Arduino
#define ONE_WIRE_BUS 2
// Setup a oneWire instance to communicate with any OneWire devices (not just Maxim/Dallas temperature ICs)
OneWire oneWire(ONE_WIRE_BUS);

// Pass our oneWire reference to Dallas Temperature.
DallasTemperature sensors(&;oneWire);
WiFiClient client;
////////////////////////////
// Initial State Streamer //
////////////////////////////

// Data destination
// https can't be handled by the ESP8266, thus "insecure"
#define ISDestURL "insecure-groker.initialstate.com"
// Bucket key (hidden reference to your bucket that allows appending):
#define bucketKey "*************"
// Bucket name (name your data will be associated with in Initial State):
#define bucketName "**********"
// Access key (the one you find in your account settings):
#define accessKey "********************"
// How many signals are in your stream? You can have as few or as many as you want
const int NUM_SIGNALS = 2;
// What are the names of your signals (i.e. "Temperature", "Humidity", etc.)
//String signalName[NUM_SIGNALS] = {"Signal 1", "Signal 2"};
// This array is to store our signal data later
String signalData[NUM_SIGNALS];

String ValueName;
String ValueData;

//////////////////////
// Network Settings //
/////////////////////
void setup() {

    sensors.begin();
  // start serial port:
  Serial.begin(115200);
  while (!Serial) {
    ; // wait for serial port to connect. Needed for native USB port only
  }

  // start wifi
  Serial.println();
  Serial.print("Connecting to ");
  Serial.println(ssid);
  WiFi.begin(ssid, password);
  while (WiFi.status() != WL_CONNECTED) {
    delay(500);
    Serial.print(".");
  }

  // The postBucket() function creates a bucket
  // (unnecessary if the bucket already exists)
  while (!postBucket()) {};
}
void loop() {
  // if there's incoming data from the net connection.
  // send it out the serial port.  This is for debugging
  // purposes only:
  if (client.available()) {
    char c = client.read();
    Serial.write(c);
  }
  sensors.requestTemperatures(); // Send the command to get temperatures
  Serial.print("Temperature");
 ValueName= "Temperature";
 ValueData=String(sensors.getTempCByIndex(0));

  // The postData() function streams our events
  while(!postData());
  // Wait for 1 seconds before collecting and sending the next batch
  delay(7000);
}

// this method makes a HTTP connection to the server and creates a bucket is it does not exist:
bool postBucket() {
  // close any connection before send a new request.
  // This will free the socket on the WiFi shield
  client.stop();

  // if there's a successful connection:
  if (client.connect(ISDestURL, 80)) {
    Serial.println("connecting...");
    // send the HTTP PUT request:
    // Build HTTP request.
    String toSend = "POST /api/buckets HTTP/1.1\r\n";
    toSend += "Host:";
    toSend += ISDestURL;
    toSend += "\r\n" ;
    toSend += "User-Agent:Arduino\r\n";
    toSend += "Accept-Version: ~0\r\n";
    toSend += "X-IS-AccessKey: " accessKey "\r\n";
    toSend += "Content-Type: application/json\r\n";
    String payload = "{\"bucketKey\": \"" bucketKey "\",";
    payload += "\"bucketName\": \"" bucketName "\"}";
    payload += "\r\n";
    toSend += "Content-Length: "+String(payload.length())+"\r\n";
    toSend += "\r\n";
    toSend += payload;

    client.println(toSend);
    Serial.println(toSend);
    return true;
  } else {
    // if you couldn't make a connection:
    Serial.println("connection failed");
    return false;
  }
}
// this method makes a HTTP connection to the server and sends the signals measured:
bool postData() {
  // close any connection before send a new request.
  // This will free the socket on the WiFi shield
  client.stop();

  // if there's a successful connection:
  if (client.connect(ISDestURL, 80)) {
    Serial.println("connecting...");
    // send the HTTP PUT request:
    // Build HTTP request.
    // Build HTTP request.

    String toSend = "POST /api/events HTTP/1.1\r\n";
    toSend += "Host:";
    toSend += ISDestURL;
    toSend += "\r\n" ;
    toSend += "Content-Type: application/json\r\n";
    toSend += "User-Agent: Arduino\r\n";
    toSend += "Accept-Version: ~0\r\n";
    toSend += "X-IS-AccessKey:  " accessKey "\r\n";
    toSend += "X-IS-BucketKey:  " bucketKey "\r\n";

    String payload = "[{\"key\": \"" + ValueName + "\", ";
    payload +="\"value\": \"" + ValueData + "\"}]\r\n";

    toSend += "Content-Length: "+String(payload.length())+"\r\n";
    toSend += "\r\n";
    toSend += payload;

    Serial.println(toSend);
    client.println(toSend);

  return true;
  } else {
    // if you couldn't make a connection:
    Serial.println("connection failed");
    return false;
  }
}
Otras Referencias similares..
- Pruebas plataforma IoT Cayenne
- Pruebas plataforma IoT Node-RED
- Pruebas plataforma IoT blynk
- Otras Plataformas
Conclusiones y Consideraciones
Initialstate es otra muy buena solución creada para el Internet de las cosas, permitiendo crear vistosos dashboards y su API de envió de datos es muy sencilla via HTTP permite que técnicamente cualquier dispositivo envié datos sin ninguna complicación.
Dado que estamos utilizando una cuenta gratuita similar a otras plataforma que hemos probado existen Restricciones respecto uso de ancho de banda y solo contamos con retención de datos de 1 dia a otros servicios esta plataforma, dichos servicios en la versión paga contienen triggers, retencion ilimitada, envio MSM, Email, Expressiones en tiempo real, compartir dashboards y dashboards embebidos y por supuesto soporte via email.
Esta pruebas se realiza simplemente para presentar otra solucion IoT del mercado.
Descargas
Librerías y ejemplos Arduino IDE InitialState Arduino Streamers.